How to Integrate Cloudflare Turnstile in Next.js 15
Tired of spammy form submissions? Learn how to add Cloudflare Turnstile to your Next.js project with clear instructions for setup, verification, and testing while keeping your forms safe and user-friendly.
Written byKelly

Table of Contents
12 min read
Intermediate
Prerequisites
- Basic knowledge of Next.js 13+ (Next.js 15 recommended)
- Node.js version 18+ installed
- NPM package manager installed (recommended)
- Cloudflare account (free plan)
So you’ve built your forms and published them online. Great work! But now bots are flooding them and real users are getting lost in the noise.
Don’t panic just yet! In this guide, I’ll walk you step by step through keeping your Next.js forms secure and spam-free using Cloudflare Turnstile. It’s a simple process, but some details are really important to make sure everything works properly.
Author's note: To make your integration even easier, you can get the full tutorial files for free from our GitHub repository, which includes the form and backend verification setup.
Understanding Cloudflare Turnstile
Let’s start with the basics: what is Cloudflare Turnstile?
Cloudflare Turnstile is a smart CAPTCHA alternative that protects your forms from bots while keeping the user experience smooth. Unlike traditional CAPTCHAs, it’s privacy-focused and easy to integrate.
Turnstile can operate in three different modes:
- Invisible: Visitors won’t see a widget. Ideal for websites that prioritize visuals and seamless user experience.
- Non-interactive: Visitors see the widget but never need to interact with it. Great for subtle form protection without disrupting users.
- Managed (recommended): Visitors may be presented with an interactive checkbox if Turnstile isn’t sure whether they’re a bot. Perfect for adaptive, powerful protection.
The best part? You can use it for free with no request limits, making securing your Next.js forms easier than ever.
Create a Turnstile Widget
Now that we know what Cloudflare Turnstile is, let’s create your first widget!
- Open the Turnstile section in your Cloudflare dashboard.
- Click “Add widget” to create a new Turnstile widget for your account.
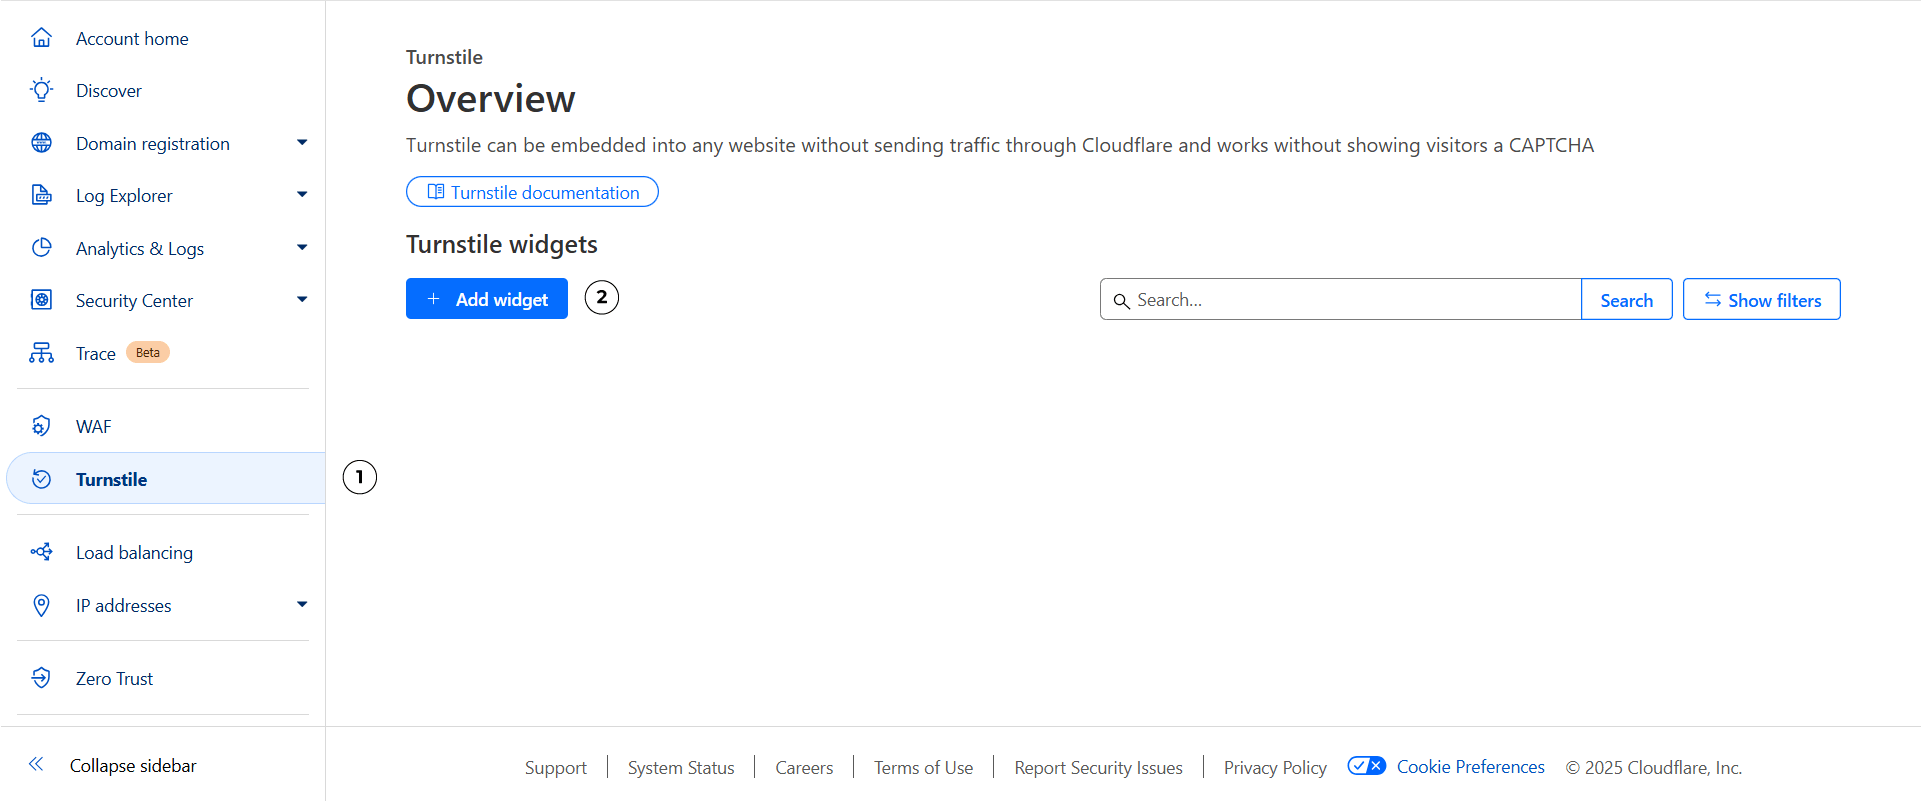
Turnstile dashboard. You might see a different one if this is your first widget
Pro tip: Make sure you're on your account dashboard, not a domain level dashboard. If you still can't find it, the search feature is really good! Just search for "Turnstile" and it will direct you to it no matter where you are.
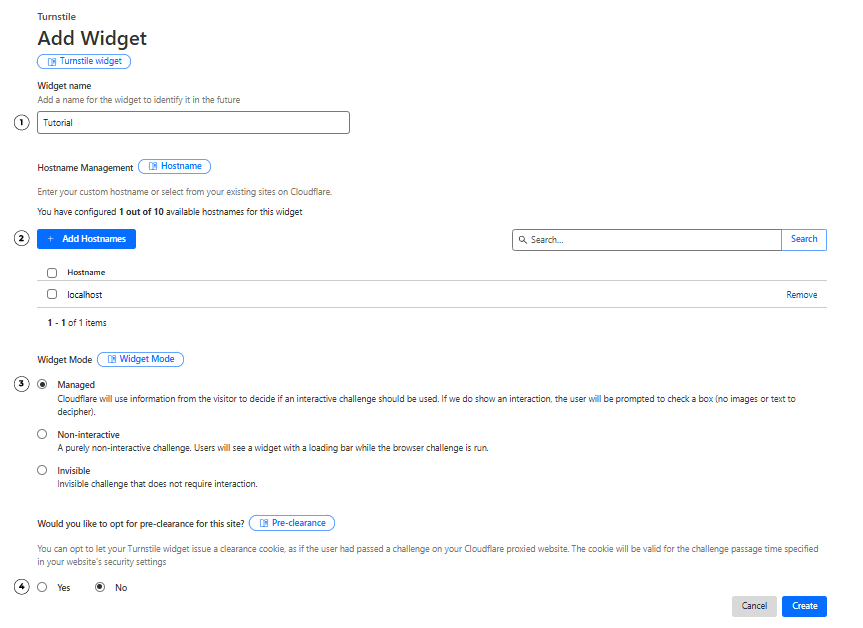
Setup
To create a new widget, you will need to configure:
- Name: Choose a unique, identifiable name for this widget
- Domains: Add the domains where you’ll use it (include
localhostfor testing) - Widget mode: For this tutorial, we will select "Managed"
- Pre-clearance setting: Recommended setting is "No" unless you are experienced with Turnstile and have read the official docs
After filling in the information, click “Create” to finish.
Turnstile widget configuration steps
Get the keys
Congratulations, you’ve just created your Turnstile widget! You’ll now see two keys that are required for integration:
- Site key: Public key, used in your frontend.
- Secret key: Private key, must remain on your server only. Never share it!
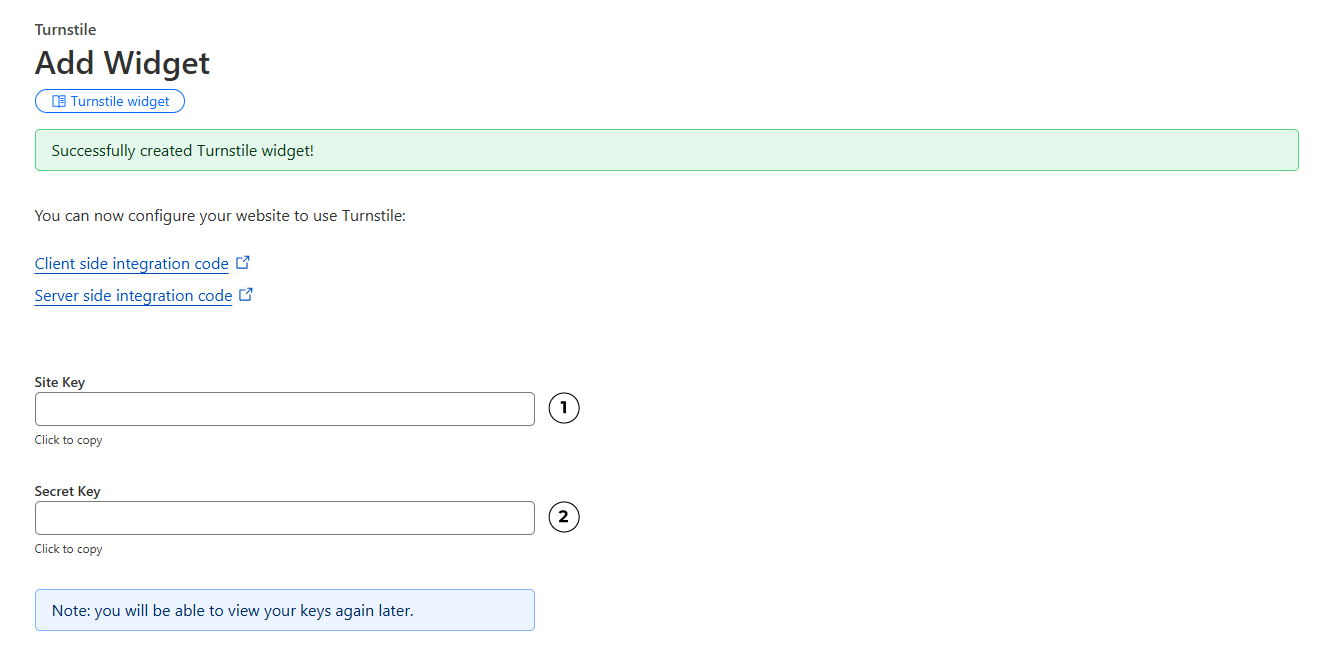
Your widget keys. Save them somewhere safe!
Adding Turnstile in Next.js
Let's now get to the juiciest part: adding your new widget to your website! This is a very straightforward integration but the details are important in Next.js to make sure it all works great within the framework environment.
Create a Next.js 15 project
This step is optional if you already have your website ready, but if you want to follow along, here's how I've setup the project:
npx create-next-app@latestYou’ll be asked a few questions:
What is your project named?  turnstile-next-15
Would you like to use TypeScript?  No / Yes
Which linter would you like to use?  ESLint / Biome/ None
Would you like to use Tailwind CSS?  No / Yes
Would you like your code inside a `src/` directory?  No / Yes
Would you like to use App Router? (recommended)  No / Yes
Would you like to use Turbopack? (recommended)  No / Yes
Would you like to customize the import alias (`@/*` by default)?  No / Yes
Once done, move into your new project and start the dev server:
cd turnstile-next-15
npm run dev
Setup the Environment
Remember those keys you got from Cloudflare after creating your widget? Go grab them! We'll add them to a .env file as environment variables.
If you didn't save them, don't worry! You can always get them by going to your Turnstile Dashboard and clicking "Edit" on your widget menu options.
NEXT_PUBLIC_TURNSTILE_SITE_KEY=[YOUR SITE KEY HERE]
TURNSTILE_SECRET_KEY=[YOUR SECRET KEY HERE]
Careful with variable names!
Make sure your public site key variable name starts with NEXT_PUBLIC_, otherwise it won't be available on the client side of your website.
But never add this prefix to your secrets as it would expose them!
Add the Cloudflare Turnstile Script
Next up, we need to add the Cloudflare Turnstile script to our website. In Next.js, the best place to do this is in the main layout.tsx file. That way, the script is loaded once and will be available anywhere you want to use a Turnstile widget.
Note: You can technically add the script in other places, but keeping it in the layout is the cleanest and most reliable approach.
import Script from "next/script";
...
return (
    <html lang="en">
      <head>
        <Script
          src="https://challenges.cloudflare.com/turnstile/v0/api.js?render=explicit"
          strategy="beforeInteractive"
          defer
        />
      </head>
      <body
        className={`${geistSans.variable} ${geistMono.variable} antialiased`}
      >
        {children}
      </body>
    </html>
  );
Let's take a second to understand what we just added. Cloudflare's Turnstile script can work in 2 different rendering modes:
- Implicit rendering: automatically scans the html and renders widgets
- Explicit rendering: you control when and how widgets are created
Here in Next.js, it is recommended to use explicit rendering to avoid the auto-render and have full control over widgets. For that, we just needed to add ?render=explicit to the URL.
Next.js also uses different strategies to load a script:
afterInteractive(default): Load the script after hydrationbeforeInteractive: Load the script before hydrationlazyOnload: Load the script later during browser idle time
In this tutorial, we’re using beforeInteractive so the Turnstile script is guaranteed to be ready before any widgets are mounted. Otherwise, you’ll likely run into some not so fun undefined errors.
Client-side Integration
Let’s add the widget to a simple form. For this example, we just have an email input:
"use client";
import { useEffect, useRef } from "react";

export default function Home() {
  const ref = useRef<HTMLDivElement>(null);

  useEffect(() => {
    const turnstile = (window as any).turnstile;
    const widgetId = turnstile.render(ref.current, {
      sitekey: process.env.NEXT_PUBLIC_TURNSTILE_SITE_KEY,
    });
    return () => turnstile.remove(widgetId);
  }, []);

  return (
    <form>
      <input
        type="email"
        name="email"
        id="email"
        placeholder="Enter your email"
      />
      <button type="submit">Submit</button>
      <div ref={ref}></div>
    </form>
  );
}
Note: Since we need to add the "use client" directive, it turns the entire page into a Client Component. For demonstration purposes this is fine, but in a real project you’ll usually want the Turnstile widget in a separate component to avoid turning the whole page into client-side code.
You should now be able to see your new widget! But we're not done just yet. We need to actually use it and handle its behavior. Cloudflare makes this easy with callbacks:
callback: triggered on successful verificationerror-callback: triggered when verification fails (e.g. if the visitor is a bot).
And that's not all! Why add this wonderful bot prevention tool if we're just letting anything submit the form? We need to disable the submit button until the visitor is verified. Here's how we can do all this:
import { useEffect, useRef } from "react";
import { useCallback, useEffect, useRef, useState } from "react";

export default function Home() {
  const ref = useRef<HTMLDivElement>(null);
  const [verified, setVerified] = useState(false);

  const handleVerify = useCallback(() => {
    setVerified(true);
  }, []);

  const handleError = useCallback(() => {
    setVerified(false);
  }, []);

  useEffect(() => {
    const turnstile = (window as any).turnstile;
    const widgetId = turnstile.render(ref.current, {
      sitekey: process.env.NEXT_PUBLIC_TURNSTILE_SITE_KEY,
      callback: handleVerify,
      "error-callback": handleError,
    });
    return () => turnstile.remove(widgetId);
  }, []);
  }, [handleError, handleVerify]);

  return (
    <form>
      <input
        type="email"
        name="email"
        id="email"
        placeholder="Enter your email"
      />
      <button type="submit">Submit</button>
      <button type="submit" disabled={!verified}>Submit</button>
      <div ref={ref}></div>
    </form>
  );
}
Server-side Integration
Good job protecting the client-side of your form! But unfortunately, that alone isn’t enough to prevent bots from spamming you. A disabled button is easy to bypass, so we need to secure the server side of our form submission.
In Next.js, the best way to handle form submissions is by using server actions. Here’s an example:
'use server'

export async function submissionAction(_prevState: unknown, formData: FormData) {
  // check turnstile first
  const turnstileResponse = formData.get("cf-turnstile-response") as string;
  const turnstileSecret = process.env.TURNSTILE_SECRET_KEY!;

  // create data for turnstile verification
  const verifyTurnstile = new FormData();
  verifyTurnstile.append("secret", turnstileSecret)
  verifyTurnstile.append("response", turnstileResponse)

  // send request to verification endpoint
  const turnstileUrl = "https://challenges.cloudflare.com/turnstile/v0/siteverify";
  try {
    const validation = await fetch(turnstileUrl, { body: verifyTurnstile, method: "POST", });
    const outcome: any = await validation.json();

    if (!outcome.success) return "You're a bot! Please go away."
    return "Hello human! Thank you for your email."

  } catch (error) {
    console.error(error);
    return "Something went wrong."
  }
}
Never cache this verification!
Make sure to never cache anything related to the turnstile widget, you need to verify the token every single time. Don't make it easier to spam your website!
Wow that was a lot of code! Let's go through it bit by bit. First, we need to get the turnstile widget's response, which is automatically added in the form data as cf-turnstile-response.
// check turnstile first
const turnstileResponse = formData.get("cf-turnstile-response") as string;
const turnstileSecret = process.env.TURNSTILE_SECRET_KEY!;
Then, along with our secret key, we send a request to Cloudflare's verification endpoint using the fetch function. This is a very important part of the process! Tokens can be forged, copied, and even stolen by malicious users so we need to verify them every time.
This endpoint verifies the authenticity of your turnstile token to protect your submissions, no extra work needed from you.
// verify turnstile
const turnstileUrl = "https://challenges.cloudflare.com/turnstile/v0/siteverify";
const validation = await fetch(turnstileUrl, { body: verifyTurnstile, method: "POST", });
After verifying the Turnstile token with Cloudflare, we just need to check the response from the endpoint. Easy peasy spam protection!
To use our new server action, we need to add it to our page:
import { useCallback, useEffect, useRef, useState } from "react";
import { useActionState, useCallback, useEffect, useRef, useState } from "react";
import { submissionAction } from "@/action";

export default function Home() {
  const [state, formAction] = useActionState(submissionAction, "");
...
return (
    <form>
    <form action={formAction}>
      ...
    </form>
  );
}
You might be thinking: “Okay, but nothing actually changes on the web page.”
You’re absolutely right! The form is already being protected (you can confirm in your dev tools by inspecting the request), but users aren’t seeing any feedback yet. That’s what we’ll tackle in the next section.
User Feedback
Just one more step left! If you already had your form fully setup, you likely already had some form of feedback to the user.
For demonstration purposes, we’ll show the form submission result in a simple <p> element.
return (
  <form action={formAction}>
    {state !== "" && <p>{state}</p>}
    ...
  </form>
);
The variable state here contains the response string from your server action (for example, "Hello human! Thank you for your email."). This simple feedback ensures users know their submission was successful or if something went wrong.
In a real project, you could style the feedback message, show success/error colors, or display more interactive notifications to improve user experience.
Testing the Integration
Congratulations! You just successfully integrated the Cloudflare Turnstile widget into your Next.js project!
Before going live, it’s important to test your integration to ensure everything works as expected. Cloudflare provides testing keys that simulate different scenarios so you can verify your forms behave correctly.
Note: Testing site keys must be paired with testing secret keys.
Here are some quick tips for testing:
- Use your browser’s dev tools to inspect the form request and verify the Turnstile token
- For production, switch to your real keys. Testing keys will not work in live usage
- The free tutorial files are preconfigured for testing, making it easy to try all scenarios
Examples: Testing Different Turnstile Scenarios
After updating your .env file with the testing keys, try the following scenarios:
Always Success
NEXT_PUBLIC_TURNSTILE_SITE_KEY=1x00000000000000000000AA
TURNSTILE_SECRET_KEY=1x0000000000000000000000000000000AA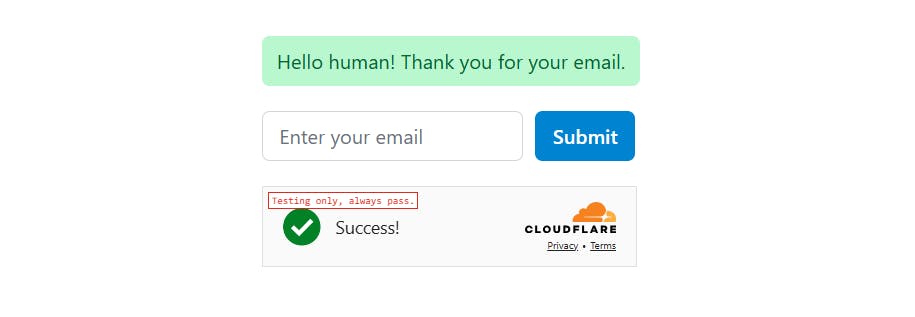
Form submitted successfully using the success testing site key
Always Block
NEXT_PUBLIC_TURNSTILE_SITE_KEY=2x00000000000000000000AB
TURNSTILE_SECRET_KEY=1x0000000000000000000000000000000AA
Form blocked by Turnstile using the block testing site key
Interactive Challenge
NEXT_PUBLIC_TURNSTILE_SITE_KEY=3x00000000000000000000FF
TURNSTILE_SECRET_KEY=1x0000000000000000000000000000000AA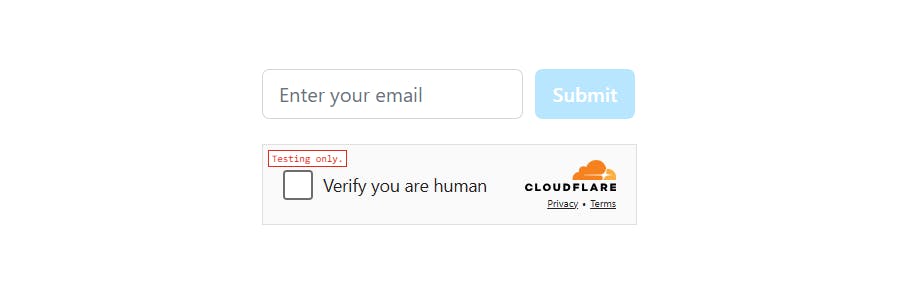
Visitor prompted to complete an interactive Turnstile challenge
Wrapping Up
You did it! You’ve successfully integrated Cloudflare Turnstile into a Next.js form, protected it on both client and server sides, added user feedback, and tested your integration. You now have a fully functional, bot-resistant form ready to use.
Key Takeaways
- Client-side integration: Add the Turnstile widget and manage verification callbacks to control form behavior.
- Server-side protection: Verify tokens with your secret key using a Next.js server action to prevent bots from bypassing your protection on the frontend.
- User feedback: Display clear messages so visitors know whether their submission was successful or blocked.
- Testing: Use Cloudflare’s testing keys to simulate success, failure, and interactive challenges before going live.
Pro Tips
- Keep your secret key safe: never expose your secret key on the frontend.
- Inspect network requests using dev tools to debug token verification.
- Test all scenarios (success, block, challenge) before deploying to production.
Next Steps
- Break your widget into a separate Client Component for better Next.js performance.
- Add themes, responsive sizing, and refresh behavior to take your widget to the next level.
- For more detailed guidance and the latest updates, check out the Cloudflare Turnstile official documentation.
